- September 29th, 2009
- /
- Do-it-yourself Invitations, Featured Invitations
- /
- 0 Comments
- /
- Feature Invitation – Autumn Elegance
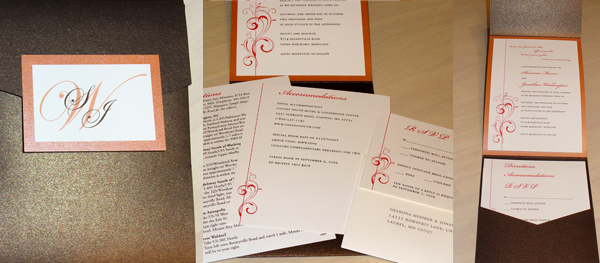
This week’s feature was submitted by Denise, who designed these for a friend. We love the creative way she incorporated the design on the main invitations as well as on the insert cards (this is a little tricky, so practice and measure!)
Here’s Denise’s Recipe:
- 5 x 7 Pocketfold – Portrait, C2 Bronze
- 5 x 7 Cardstock, C2 Sunstone
- Invitation Layer, custom cut to 4.5 x 7.5, C1 Classic White
- Seal backing layer – 2.5 x 3.5 C2 Sunstone (if you order the 3.5 x 5 cards, you can cut 2 each if you cut yourself)
- Printed Seal – 2 x 3, C1 Classic White
- Outer Envelope – 5 x 7 C1 Classic White w/ optional envelope liner in C2 Sunstone (not shown)
Enclosure Cards – C1 Classic White:
- Direction Card cut to 5 x 6.75*
- Accommodations card cut to 5 x 6*
- RSVP Card, 3.5 x 5 (floated higher in the pocket)
- RSVP Envelope (fits 3.5 x 5 products)
*Note that this design “bleeds” off the edge on all the cards. To achieve this look, you need to print on a larger sheet and cut down after printing.
Denise printed her invitations on a color laser printer. Here are her tips to creating your own successful invitation at home:
- Buy samples of what you think you want: I bought all the pieces I thought I might use and tested and measured everything before I bought enough to do all 100+ invites.
- Do a full mock up of what you want before you get into it – make sure you know how everything will fit, down to the RSVP envelope fitting in your pocket (if you have something like that).
- Buy extra…especially of envelopes: I ran the envelopes through my printer and it took a few tries to get everything to line up just right.
- Start early: things always take long than you think.
- Test adhesives: I thought I was going to use a Tombo brand Power Bond tape, but found the Permanent Bond tape worked better. The first one didn’t stick as well to the metallic finish on the metallic paper. (NOTE from EnvelopMe.com – We recommend the 3M tape sold on the website. It will adhere the various stocks and is recommended by the manufacturer as well.)
- Have things cut to the size you want: don’t waste the time trying to do it yourself. Just have Envelopements do it.
- Test printing colors: If you want the paper you buy to match the ink you’re printing with, do a few test runs in advance until you have the right color. Different printers (like Kinkos and Staples) print differently than what you get at home.
Hope you like them!
Denise
Thanks for sharing these beautiful invitations, Denise!


